Ways to export contacts in CSV format
Step-by-Step Guide to Exporting Contacts from Popular Platforms

How to Export Contacts from Google Contacts
Step 1: Open Google Contacts.
Open a web browser, go to Google Contacts, and log in with your Google account.
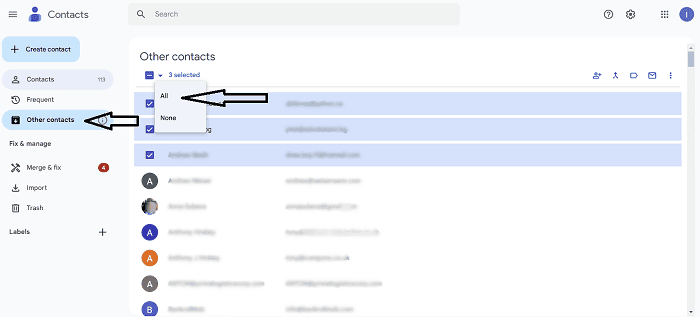
Step 2: On the left-hand menu, click Other contacts.
Step 3: Select the contacts group you want to export or choose All Contacts.
- A single contact: Check the box next to the contact name.
- Multiple contacts: Check the boxes next to all the contacts you want to export.
- All contacts: Check the box next to any contact and in the top left, click Selection Actions and then All.

Step 4: At the top right, click More actions and then Export.

Step 5: Choose the export format:
- Select Google CSV to import contacts into another Google account.
- Select Outlook CSV to import contacts into Microsoft Outlook as Outlook contacts.
- Select vCard for Android or iOS to export the contacts into vCard files.
*A vCard is a file format used for electronic business cards, typically attached to emails, containing details like name, address, phone numbers, email addresses, company logos, and photographs.
Step 6: Click Export. The file will download to your computer.

How to Export Contacts from Microsoft Outlook
Step 1: Open Microsoft Outlook
Open the Outlook desktop app or log in to Outlook through the web at Outlook.com.
Step 2: Access the Export Feature
For Outlook Desktop (Windows):
1. Go to File Menu: In the top-left corner, click File.
2. Choose Open & Export, then select Import/Export.
3. In the Import and Export Wizard, select Export to a file and click Next.
For Outlook on the Web:
1. In the navigation pane, click the People icon (or Contacts).

2. Look for the Manage Contacts, then click Export contacts.

Step 3: Choose the CSV format
Step 4: Select Contacts to Export
1. In the list, select the Contacts folder you want to export.
2. If you want to export all contacts, ensure the root Contacts folder is selected.
Step 5: Save the File
1. Choose a location on your computer to save the file (e.g., Desktop or Downloads folder).
2. Name the file (e.g., "My Contacts.csv").
3. Click Finish: Outlook will create and save the CSV file.
How to Export Contacts from LinkedIn
Step 1: Open LinkedIn Settings
1. Log in to your LinkedIn account.
2 Click on the Me icon at the top-right of your homepage.
3. Select Settings & Privacy from the dropdown menu.
Step 2: Navigate to Data Privacy
1. In the Settings & Privacy page, click on the Data Privacy tab in the left-hand menu.

2. Scroll down to the How LinkedIn uses your data section.
3. Click on Get a copy of your data.

Step 3: Select the data you want to export
1. Under the data options, check the box next to Connections.
2. Click the Request archive button.

Step 4: Wait for LinkedIn to Process
1. LinkedIn will prepare your data and send you an email notification once the file is ready to download.
2. This process typically takes a few minutes but can take up to 24 hours.
Step 5: Download Your Data
1. Open the email from LinkedIn when you receive it.
2. Click the provided link to go to the download page.
3. Click Download Archive to save the file to your computer.
How to Export Contacts from Apple Contacts (Mac)
Step 1: Open Apple Contacts
Launch the Contacts app on your Mac.

Step 2: Select Contacts to Export
1. Export All Contacts: Press Command + A to select all contacts.
2. Export Specific Contacts: Hold Command and click on individual contacts to select them.
Step 3: Export as vCard
1. Go to the File menu and select Export > Export vCard.

2. Save the vCard file to your preferred location on your Mac.

Step 4: Convert vCard to CSV
Since Apple Contacts doesn’t directly support CSV export, you’ll need to convert the vCard file into CSV format:
Use an online vCard to CSV converter:
1. Search for “vCard to CSV converter” in your browser.
2. Upload the vCard file and convert it to CSV.
Or use a third-party app:
1. Download a contact conversion app from the Mac App Store.
2. Use the app to open your vCard file and convert it to CSV format.
How to Export Contacts from X (Twitter)
Step 1: Log into Your X Account
Open the X (Twitter) app or website and sign in to your account.
Step 2: Access Your Account Settings
1. Click on your profile icon in the top-left corner of the app (or on the website, click More in the side menu).
2. Select Settings and privacy.

Step 3: Navigate to Your Data
Click on Your account and then select Download an archive of your data.

Step 4: Request Your Data
1. You may be prompted to verify your password or authenticate via email or phone.
2. Once verified, click Request archive to generate a downloadable file of your account data.
Step 5: Wait for the Archive
1. X will process your request, which may take a few hours to a couple of days.
2. You’ll receive an email or a notification once your archive is ready for download.
Step 6: Download the Archive
Follow the link in the email or notification to download your archive.
How to Export Contacts from Facebook / Instagram
Step 1: Log into Your Facebook Account
Open Facebook in your browser and log in.
Step 2: Access the Data Download Tool
1. Click your profile picture in the top-right corner.
2. Select Settings & Privacy, then choose Settings.
3. Click on Your Facebook Information in the left-hand menu.
4. Select Download your information.

Step 3: Choose Data to Export
1. Download profile information in Accounts Center - Continue.

2. Select the source from which you want to retrieve information.

3. Select the data you wish to download (Friends and Followers) and tap Next to continue.

4. If you chose Instagram, select Contacts and click on Next.

Step 4: Download the Data
1. Choose to download a copy to your own device or transfer a copy to another service.

2. Choose a date range, such as the last year, the last three years, or all-time. After selecting the desired range, choose the file type for the export.

3. Click "Create File" at the top of the page after selecting the necessary options.
4. Wait for Facebook to generate the file. You’ll receive a notification or email once it’s ready.
5. Download the file to your computer.
Step 7: Extract and Save Contacts
1. Open the downloaded file to access the data.
2. For a smaller number of contacts: Manually copy and paste each contact’s name and email address into an Excel file.
3. For a larger list: Copy all contacts (paste the text-only data into Excel to streamline the process).
4. Save the Excel file in a CSV format.
